
Are you struggling to efficiently manage your Amazon PPC ads, like many other Amazon sellers and brands? Having spent countless hours working on Amazon ads, Mina has developed a step-by-step guide to help you streamline your ad management process and become more time-effective.
Discover effective strategies to ensure that you can proficiently manage your Amazon ads.
Scale Your Amazon Revenue with a Custom Growth Plan
Book a strategy call with our Amazon experts. We’ll review your listings, PPC, and funnel to identify quick wins and build a 90‑day plan to grow profitably.
Book a Strategy CallData Documentation
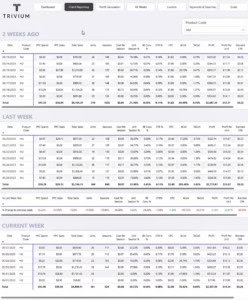
Keeping track of data is important because it lays the groundwork for what we’re trying to do. If we don’t have well-documented data, we lack a reliable starting point.
The issue is, you can’t depend on Amazon because they have data in Campaign Manager and Business Reports, but it doesn’t calculate your profits, and the cost of goods is not included.
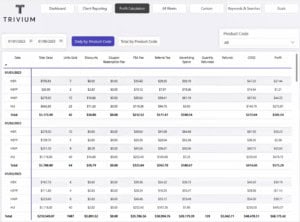
To begin, you will require analytics. You can access our analytics template, Trivium Analytics, and then you can proceed to fill it out.
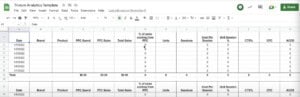
The Trivium Analytics sheet is FREE and is included in our Amazon Growth Toolbox along with our other helpful tools and resources.
Sign up here to gain access to our toolbox.

The following are the essential metrics you should have:
- PPC Spend
- PPC Sales
- Total Sales
- Sessions
- Units
- Cost Per Session
- Click Through Rate (CTR)
- Conversion Rate (CVR)
- Advertising Cost of Sales (ACoS)
- Total Advertising Cost of Sales (TACoS)
- Cost per Click (CPC)
- Sale Price
- Amazon Fees
- Cost of Goods Sold (COGS)
- Profits
Setting The Goal – Scale or Optimize?
The crucial step is to determine your primary objective. Are you:
- Scaling OR
- Optimizing
It’s essential to avoid the major mistake of pursuing both goals at the same time. This means avoiding actions such as launching new campaigns, reducing bids, lowering budgets, and increasing bids by placement all at once.
Such actions can lead to conflicting changes in ad spend and sessions, making it difficult to figure out what’s causing the ups and downs.
Scaling: involves increasing your ad spend and sessions, with the hope of increasing revenue. While this might lead to a temporary dip in profit, it’s aimed at scaling up your overall revenue.
Optimizing: ad spend decreases, your conversion rate improves, and your profits increase. While this might lead to a decrease in revenue, it’s aimed at discovering new profitable search terms and improving the overall profitability of your campaigns. Some less profitable search terms may lead to a drop in revenue, but an increase in profitability.
Scaling
When aiming to scale, the actions that you need to take are:
- Increasing bids
- Increasing budgets
- Increasing bid by placement
- Launching new campaigns
- Launching different campaign types
Sponsored Products should generate about 85% of all of your revenue. You can use Sponsored Brand for your brand keywords, and you can use Sponsored Display for retargeting, but don’t stress too much about those right now.
1. Increasing Budget
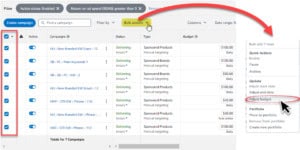
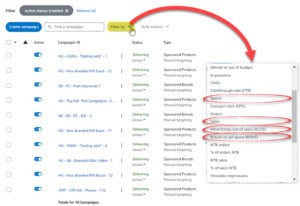
- Go to your Campaign Manager in Amazon Seller Central where you’ll see all of your campaigns
- Click on Filter By
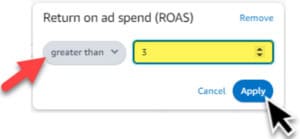
- From the options in the dropdown, select Return on Ad Spend (ROAS)

- I recommend to set it to great than 3 (or 4) or your preferred threshold. This will show you all campaigns with greater than 3X ROAS. Once set, click apply

- After applying the filter for ROAS, tick the topmost checkbox to select all items
- Click Bulk actions
- From the options in the dropdown, select Adjust budget

- Click the dropdown options for Adjust budget and select Increase budget by ($)
- Enter the amount to increase the. budget by (e.g., $100, $200, $300). Once set, click Save changes


With these filters, we’re identifying all of the campaigns that are already profitable to increase their budgets. So, you might have a $100 budget and you’re spending $50. Next thing, you’ll have a $500 budget, and now maybe you’re spending $80 or $90.
Even if these campaigns aren’t using up all their budgets, the idea is that by giving them more room, Amazon might recognize the opportunity to display them more frequently, potential leading to increased sales. Even though it’s not that much, it’s still a little bit more profitable.
2. Increasing Bids
Increasing bids for exact
The first target will be the Exact keywords because Auto, Broad, Phrase, and expanded ASIN have a lot of different keywords in them. And before scaling them, it’s important to add some negatives first.
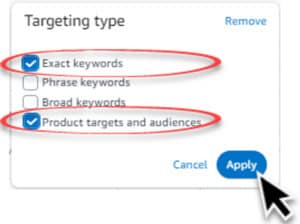
- Go to the Targeting tab within Campaign Manager
- Follow Steps 1.2 – 1.4 (above) to set a filter for ROAS
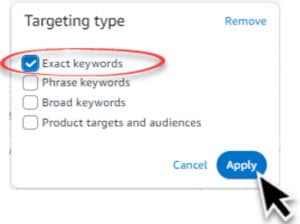
- Set another filter by clicking again on Filter by
- Select Targeting type
- Choose Exact keywords
- Click Apply

- Tick the topmost checkbox to select all items
- Click Bulk Actions
- From the options in the dropdown, select Adjust budget
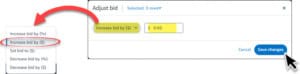
- Select Increase bid by ($) and enter a certain amount to increase the bid by
- Once done, click Save changes


Small and gradual adjustments, such as increases of $0.03, $0.05, or $0.10, are preferred. These adjustments are made regularly to maintain control.
The aim is to observe the impact on a smaller scale, avoiding rapid scaling that can lead to challenges in management, such as going from $100 ad spend to $300. The goal is to achieve slow and steady growth instead of sudden and unpredictable shifts.
Adding Negatives from Search Term Report
First, we’ll add negatives. Even though it was mentioned not to move in opposite directions, it’s important to remove anything in those keywords that isn’t doing well when trying to expand profitable search terms.
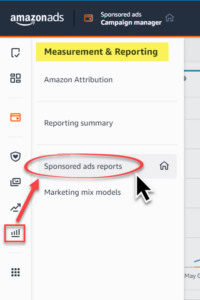
- On the left pane, click Measurement & Reporting
- Select Sponsored ads reports

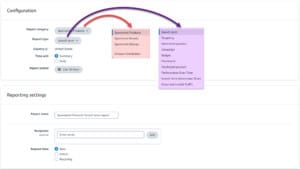
- Configure the report as follows:
- Reporting Category – Sponsored Products
- Report Type – Summary
- Time Unit – Summary
- Report period – Last 30 days

- For Reporting settings, chose Now as the Request time
- Click Run report at the top right of the page
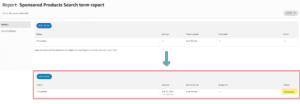
- Refresh the page to access the Download link once the report has completed downloading

- Locate and open the downloaded file
- Be sure to click Enable editing and Enable content if the options appear
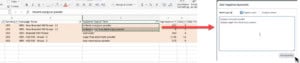
- Highlight all the data > Sort and Filter > Filter to add filters to the first row
- Apply the following filters:
- 7 Days Total Sales = $0 (zero or no sales)
- Spend = for example, greater than $10
- Find the campaigns
- Take all the keywords from the filtered STR to add them as negatives

This only applies for Auto, Broad, and Phrase campaigns and expanded ASIN. This doesn’t apply for Exact because we’re already adjusting the bids directly on those so we don’t need to add negatives and there aren’t any search terms.
Increasing bids for Auto, Broad, Phrase and Expanded ASIN
- Go back to the Targeting tab within Campaign Manager
- Follow steps 1.2 to 1.4 to set a filter for ROAS
- Set another filter by clicking again on Filter by
- Select Targeting type
- Choose Auto, Broad, Phrase, and Expanded ASIN
- Click Apply
- Tick the topmost checkbox to select all items
- Click Bulk actions
- From the options in the dropdown, select Adjust budget
- Select Increase bid by ($) and enter a certain amount to increase the bid by
- Once done, click Save Changes

Gradually increase the bids for these keywords, focusing on higher ROAS keywords by setting different bid increases for different ROAS ranges (e.g., $0.10 for 7X ROAS, $0.05 for 5X ROAS)
3. Increasing Bids
Launch Campaigns for Profitable Search Terms
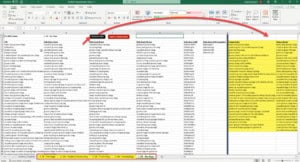
This task can be quite challenging if you don’t have access to our Deduplication Macro sheet which we have created. Therefore, it is strongly recommended to download the sheet, which is an Excel macro.
It makes our life 10 times easier. My team uses it. We don’t rely on software. We’ve built all of our macros, and we made it super user-friendly. I made it user-friendly for my team. I want them to run tasks efficiently and not waste too much time.
The Deduplication Macro sheet is free and is included in our Amazon Growth Toolbox along with our other helpful tools and resources.
- Download and open the Deduplication Macro – a detailed instructional video is available in the Amazon Growth Toolbox to guide you step-by-step on how to use the macro.
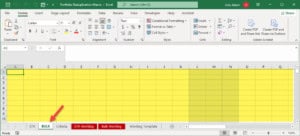
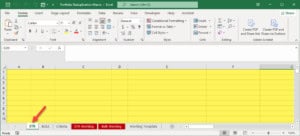
- Paste the bulk sheet data in the BULK tab

- Paste the STR in the STR tab

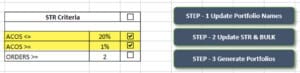
- Set the filters for the ACOS. The recommendation is anything between 1% to 20%

- Once all criteria and filters are set, you can perform the deduplication by clicking on Generate data for each portfolio
- You may now start launching these keywords as separate campaigns
Campaign Budgets and Bids
- The recommendation is to set campaign budgets no less than $100
- You can be a little bit more conservative when you start on campaign bids. If the suggested bid is a dollar, you can start at $0.75 and you can work your way up if you’re limited and on a budget. If you want to go aggressive, start one and a half times the suggested bid unless the suggested bid is maybe $7 which isn’t worth it.
4. Increasing Bids by Placements
Examine placement performance within your top-performing campaigns. You can do this manually:
- by going into each campaign, or,
- by using the bulk sheet – which is a faster way
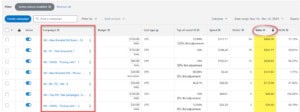
By Campaigns
- If you sort campaigns by Sales, you’ll notice that, per product, 10 campaigns generate most of the sales.

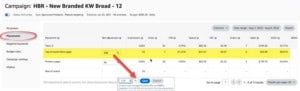
- So you can go into each one of those campaigns > Placements tab
- Increase bids by placement for those placements that demonstrate better ROAS and Click-Through-Rates
- For instance, if Top of search (first page) performs well, consider a 25% bid increase for that placement. So, instead of if your bid was $1, where someone spends $1 to appear, you can spend up to $1.25 to show up at the Top of Search (first page). This is because, according to data, you perform much better there.
Remember to maintain controlled and gradual scaling to avoid drastic changes in ad spend.
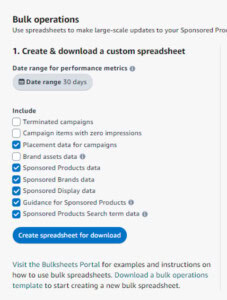
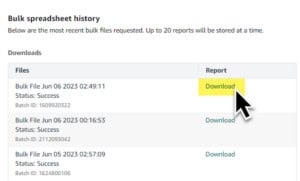
Using Bulk Sheet
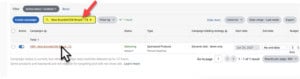
- Go to Campaign Manager > Sponsored ads > Bulk Operations

- Click Create spreadsheet for download

- Your download will appear at the b bottom under downloads. Once the file is ready to be downloaded, you can click Download

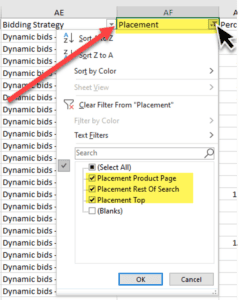
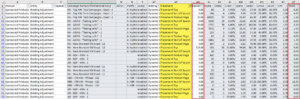
- Highlight all the data > Sort and Filter > Filter to add filters to the first row
- Show only placements

- Review the bid by placement and ROAS for these different placements
- For placements like Top of Search that has a better ROAS and better CTR, or Product Pages that has a better ROAS and better CTR, you can increase the bid by placement

- For placements like Top of Search that has a better ROAS and better CTR, or Product Pages that has a better ROAS and better CTR, you can increase the bid by placement

Optimizing
Now, when optimizing in the opposite direction, here’s what to do. Lower the bids without adjusting campaign budgets, concentrating solely on bids.
The goal is to decrease bids without touching campaign budgets. Additionally, add negative keywords and eliminate the bid by placement.
1. Lowering Bids
Lowering Bids for the Exact and Product Target
- Exactly what we did in the Targeting tab, except you’re going to add different filters. This will show you all of the keywords that are not performing well.
- Spend – let’s say, greater than $10
- Sales – no sales (so say sales equals zero)
- ACOS – greater than 80%
- ROAS – less than 1.5x

- Set another filter by clicking again on Filter by
- Select Targeting type
- Start with Exact and Product targeting

- Click Apply
- Tick the topmost checkbox to select all items
- Click Bulk actions
- From the options in the dropdown, select Adjust budget
- Select Decrease bid by ($) and enter a certain amount to increase the bid by
- Click Save changes

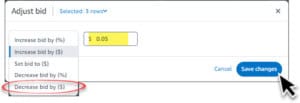
Do not lower too much, lower by $0.03, $0.05, $0.07. Don’t go too aggressive because you want to just move your position slowly down the page, not go from middle of page one to bottom of page three. Then you’re just not going to have any sales.
2. Adding negatives from Search Term Report
- Follow ‘Adding Negatives from Search Term Report Steps 1 – 8 on downloading and prepping an STR
- Apply the following filters:
- Spend = greater than $10
- Sales = no sales
- ACOS = greater than 80%
- ROAS = less than 2x
- Find the campaigns
- Take all the keywords from the filtered STR to add them as negatives.

3. Lowering Bids by Placement
- Finally, examine the performance of placements within your campaigns. If placements that were previously bid up have now shown poor ROAS, reduce their bids.
- Gradually decrease placement bids, moving from high bid percentages to lower ones. Bring that back down to zero, or maybe from $100 to $50, $50 to $25, and so on.
Analytics
Automated System
You can use our automated system. If you want, hit me up and I’ll get you connected. It’s only available through us. It’s built on My Real Profit (MRP), which is a software company, but it’s only available through us because it’s our custom development.
Trivium Analytics Template
Alternatively, you can receive the Google Sheet template for free and fill it in. Hiring a VA to handle the tasks might be necessary, and doing it yourself is not recommended as it will consume a significant amount of time, which could be better utilized.
Balancing Growth and Optimization
- Keep in mind that it’s often more beneficial to focus on positive growth by scaling first (increasing bids, increasing budgets, increasing bids by placements, launching new campaigns) to create more room for optimization. This allows you to maximize your profits in the long run.
- After a few weeks of scaling, optimizing for profit (lowering bids, adding negatives, and removing bid by placement or lowering the bid by placement) becomes more effective since there’s room for improvement.